Tutorial: Registering the Brain/MINDS Marmoset Atlas to new Data Using ANTs
Introduction
This tutorial will teach the user how to use Advanced Normalization Tools (ANTs) to do image registration in 3D using data from Brain/MINDS data portal and how to apply the transforms/inverse transforms from image registration.
This is an important step if the user wants to map the Brain/MINDS Marmoset Brain Atlas to their own data.
ANTs Installation
The latest release of ANTs can be found on the official github page.
This tutorial uses ANTs v2.5.0 (Eurymyrmex).
- If your platform is a popular one, you may directly download the binaries package containing the compiled version of ANTs in the
Assetssection within the release github page.
Please follow the installation instructions to properly install the binaries package.
- In case there is no binaries package for your platform, you’ll have to compile ANTs from sources.
Please follow the guide to compile and install ANTs for Linux/MacOS or Windows.
Download Sample Data
In this tutorial we will use the data from both BMA 2017 Ex Vivo v1.1.0 and BMA 2019 Ex Vivo v1.0.0 Brain/MINDS Atlases.
Specifically, the files we need for this tutorial are:
| File name (and download link) | ID within the tutorial | Atlas version |
|---|---|---|
bma-1-mri.nii.gz | brain1 | BMA 2017 |
bma-1-region_seg.nii.gz | label1 | BMA 2017 |
sp2_avg_mri_exvivo_t2wi_v1.0.0.nii.gz | brain2 | BMA 2019 |
sp2_label_512_v1.0.0.nii.gz | label2 | BMA 2019 |
The files can be downloaded from Dataportal GIN server by typing the following commands in a terminal :
wget https://datasets.brainminds.jp/brainminds/BMA-2017/raw/master/bma-1-mri.nii.gz
wget https://datasets.brainminds.jp/brainminds/BMA-2017/raw/master/bma-1-region_seg.nii.gz
wget https://datasets.brainminds.jp/brainminds/BMA-2019/raw/master/bma_2019_exvivo/base_data/sp2_avg_mri_exvivo_t2wi_v1.0.0.nii.gz
wget https://datasets.brainminds.jp/brainminds/BMA-2019/raw/master/bma_2019_exvivo/labelmap/sp2_label_512_v1.0.0.nii.gz
Note : NIfTI files can be viewed with tools such as ITK-SNAP or 3D Slicer.
Tutorial steps
Here, we will demonstrate how the map label1 from BMA 2019 onto the brain2 from BMA 2017 and vice versa.
Prepare a working directory and copy all the data files described above. In the following steps, all commands will be executed from this working directory.
Registering brain1 to brain2
This step is performed by running the following command :
antsRegistrationSyNQuick.sh -d 3 \
   -f sp2_avg_mri_exvivo_t2wi_v1.0.0.nii.gz \
   -m bma-1-mri.nii.gz  \
   -o brain1_to_brain2_
Lets go over each arguments in the above command:
| Argument | Value | Explanation |
|---|---|---|
| -d | 3 | This is the dimension, since we are working with 3D volumes, the dimension is 3. |
| -f | sp2_avg_mri_exvivo_t2wi_v1.0.0.nii.gz | This is the fixed image or the image we want to register to, in our case, this will be brain2. |
| -m | bma-1-mri.nii.gz | This is the moving image or the image we want to register, in our case, this will be brain1. |
| -o | brain1_tobrain2 | This is the output prefix, in this example, the output files will all have the prefix ”brain1_tobrain2″ |
| Optional argument | ||
| -n | 8 | This is the number of thread to use during registration to speed things up, it is recommended to add this to the end of the above command. |
Note : The registration process might take up to 20 minutes or more depending on how many threads you are using and how much your CPU can handle.
Outputs
After the registration command finishes, there should be 5 new files in the same folder:
| File name | Description |
|---|---|
| brain1_to_brain2_0GenericAffine.mat | Affine transform. |
| brain1_to_brain2_1InverseWarp.nii.gz | Inverse displacement field. |
| brain1_to_brain2_1Warp.nii.gz | Displacement field. |
| brain1_to_brain2_InverseWarped.nii.gz | This is the result of brain2 registered to brain1. |
| brain1_to_brain2_Warped.nii.gz | This is the result of brain1 registered to brain2. |
As you can see from the above outputs, running the registration command will give you the necessary transforms to register brain2 to brain1 and the inverse transforms.
Applying transforms
In this next step, we will demonstrate how to use the transform files to perform direct and inverse transforms.
Direct transform (Map label1 to brain2)
This direct transform is performed by running the following command :
antsApplyTransforms -d 3 \
  -i bma-1-region_seg.nii.gz \
  -r sp2_avg_mri_exvivo_t2wi_v1.0.0.nii.gz \
  -o label1_to_brain2.nii.gz \
  -t brain1_to_brain2_1Warp.nii.gz \
  -t brain1_to_brain2_0GenericAffine.mat \
  -n NearestNeighbor
Lets go over each arguments in the above command:
| Argument | Value | Explanation |
|---|---|---|
| -d | 3 | This is the dimension, since we are working with 3D volumes, the dimension is 3. |
| -i | bma-1-region_seg.nii.gz | This is the volume we want to register, in this case, label1. |
| -r | sp2_avg_mri_exvivo_t2wi_v1.0.0.nii.gz | This is the reference image we are registering to, in this case, brain2. |
| -o | label1_to_brain2.nii.gz | This is the output file. |
| -t | brain1_to_brain2_1Warp.nii.gz | The transforms are applied from right to left, so this is the 2nd transform to be applied, in our case, we will apply the displacement field 2nd. |
| -t | brain1_to_brain2_0GenericAffine.mat | This is the first transform to be applied, here we will apply the affine transforms. |
| -n | NearestNeighbor | This is the interpolation method to be used, which is not necessary in most cases, here, since we are applying transforms to a label map, we will use NearestNeighbor. |
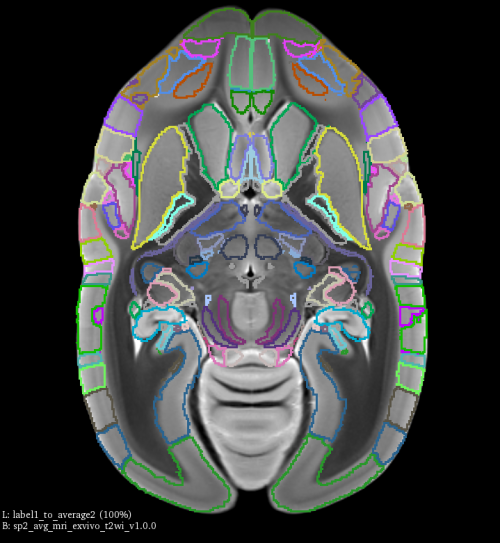
You can examine the output using 3D slicer, by loading both label1_to_brain2.nii.gz and sp2_avg_mri_exvivo_t2wi_v1.0.0.nii.gz, the transformed label1 should match the shape of brain2 as shown in the image below.
Inverse transform (Map label2 to brain1)
To apply the inverse transform, run the following command :
 antsApplyTransforms -d 3 \
    -i sp2_label_512_v1.0.0.nii.gz \
    -r bma-1-mri.nii.gz \
    -o label2_to_brain1.nii.gz \
    -t [brain1_to_brain2_0GenericAffine.mat, 1] \
    -t brain1_to_brain2_1InverseWarp.nii.gz \
    -n NearestNeighbor
Lets go over each arguments in the above command :
| Argument | Value | Explanation |
|---|---|---|
| –d | 3 | This is the dimension, since we are working with 3D volumes, the dimension is 3. |
| -i | sp2_label_512_v1.0.0.nii.gz | This is the volume we want to register, in this case, label1. |
| -r | bma-1-mri.nii.gz | This is the reference image we are registering to, in this case, brain1. |
| -o | label2_to_brain1.nii.gz | This is the output file. |
| -t | [brain1_to_brain2_0GenericAffine.mat, 1] | The transforms are applied from right to left, so this is the 2nd transform to be applied, in our case, we will apply the inverse of the affine transforms 2nd. |
| -t | brain1_to_brain2_1InverseWarp.nii.gz | This is the first transform to be applied, here we will apply the inverse displacement field. |
| -n | NearestNeighbor | This is the interpolation method to be used, which is not necessary in most cases, here, since we are applying transforms to a label map, we will use NearestNeighbor. |
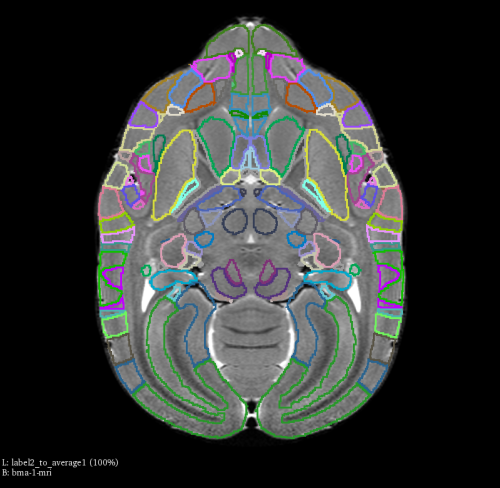
You can examine the output using 3D slicer, by loading both label2_to_brain1.nii.gz and bma-1-mri.nii.gz, the transformed label2 should match the shape of brain1 as shown in the image below.
If you want to compare the result with the label map before registration, you can do it by loading sp2_label_512_v1.0.0.nii.gz and bma-1-mri.nii.gz.
Applying multiple transformations
Imagine a situation where we have three images A, B and C, and after registering A to B and C to B, we would have the transformations files.
Now we have enough information to transform A to the space of C without doing registration of A to C.
To do this, we would use the following command :
antsApplyTransforms -d 2 \
   -i A \
   -r C \
   -o AtoC \
   -t [C_to_B_0GenericAffine.mat, 1] \
   -t C_to_B_1InverseWarp.nii.gz \
   -t A_to_B_1Warp.nii.gz \
   -t A_to_B_0GenericAffine.mat
Since the transforms are applied from right to left, here, we want to apply transforms in the order of A to B first then the inverse of C to B.
By following this rule, you can apply multiple transformations in order to transform images into different spaces.
Last updated on 06-09-2023